This post may contain affiliate links. Please see my affiliate disclaimer for more information.
I’ve owned my ATX power rack since February 2017 so it’s fair to say I’ve had plenty of time to get to know it!
Having seen and tried to respond to a number of posts on various fitness forums about the ATX brand and their products which are not well known online I thought I would pull together this review to help anyone considering buying an ATX power rack and frantically Googling for reviews or experiences.

At a glance…
- ATX PRX-830 is a high quality four post power rack which undercuts Rogue on pricing
- Features include numbered uprights, swing in safeties and monolift J hooks
- Plenty of accessories available including dip handles, weight storage pegs and various J hooks
- Downside is a confusing range and hard to see all the available accessories
My Review of an ATX Monster Floor Mount Power Rack (PRX-830)
So what ATX rack do I have, exactly? A surprisingly difficult question to answer as they have a pretty complicated naming convention to cover their vast range of products!
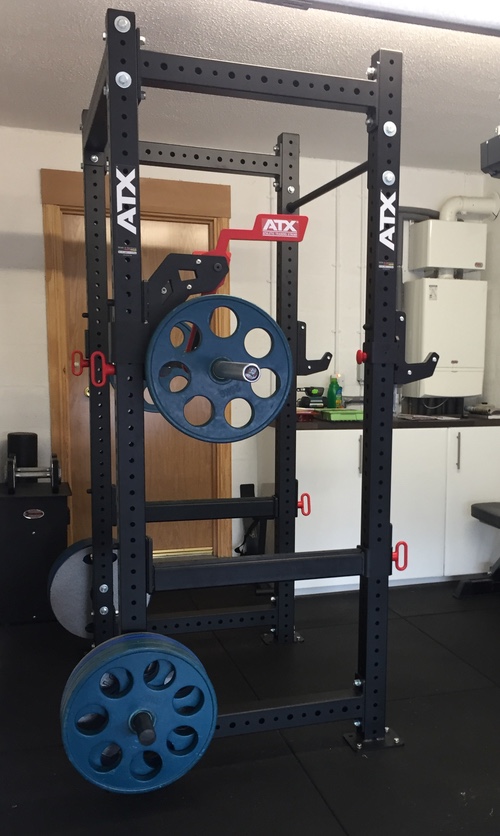
I have the equivalent of an ATX PRX-830 which is a four post, floor mounted power rack. It has front to back crossmembers at the top and bottom, with lateral crossmembers only at the top. One of these cross members is a plain, straight pull-up bar.
There are a ton of accessories available so you can tweak your safeties or J hooks to match your needs, or possibly add more trinkets as your budget, space or requirements allows.
When buying the rack I went for the following spec:
- Sandwich-Style J-hooks
- Monolift attachment
- Box-Section safeties
- 2x weight storage horns
I’ll run through my experience of everything piece by piece.
ATX four-post rack – the ultimate home gym rack?
The PRX-830 power rack is made with 11 gauge (3mm thick), 80mm x 80mm box section steel and is rated to 2000kg! Even the simple four post floor mount version I have weighs in at a stonking 140kg – that’s a lot of steel This is commercial level gym equipment and it will be more than enough for any home gym user.
The reality is if you’re comparing good quality four post racks from different manufacturers then they are all more similar than they are different. The devil and differentiators are in the detail.
The rack is extremely sturdy and while the 80mm box section construction is over the top, it’s pretty to look at and doesn’t have much downside (other than cost). If you like ultra wide grip for squats or bench you may encounter some issues – but this seems very, very rare.
As standard this rack comes with laser cut hole numbers on the uprights – a nice feature to have in the standard package (not available on the Rogue Monster Lite range in the UK). In truth it isn’t a deal breaker as I use coloured spot stickers to mark the heights I regularly use as otherwise I’d forget between workouts anyway!

ATX offer Westside hole spacing on some of their lighter ranges but not on the high spec 800 series. I don’t think this is a deal breaker as I have covered extensively elsewhere on the blog. The spacing on the 800-series is similar to the 2” spacing Rogue offer (2” vs 5cm) on their top Monster line racks.
It was delivered via pallet (although the driver did not have a tail lift so we had to walk each piece from the lorry to my garage leaving the pallet itself on the truck) and it was a two person job to move the uprights due to their length and weight. It felt like it was from a different planet to the CF475 I had previously.
You can have any colour you want… As long as it’s black!
It would be nice to have colour choices which Rogue offer to an extent (red, black or clear coat). I have seen pictures through the official ATX social media accounts that imply this is something they either offer in some locations or MIGHT one day release, but all configurations on the UK distributors site are black finishes so it certainly isn’t advertised if it is indeed available.
In all likelihood if it was an option this would have just led to dozens of hours of painful procrastination on what colour scheme I wanted (before I picked black anyway) – but hey, who doesn’t like agonising over what shade of red they want their pullup bar to be?
The black powder coat finish has lasted perfectly – there are virtually NO marks or chips on it despite continual use since installation. There are a few minor imperfections around the top of the uprights that were there from the factory – they are miles away from my eye line and have no impact on anything so I’ve never done anything about them. Truth be told I think 90% of people wouldn’t notice (I only spotted them during installation!)
Bolting the rack down – in to the platform vs concrete?
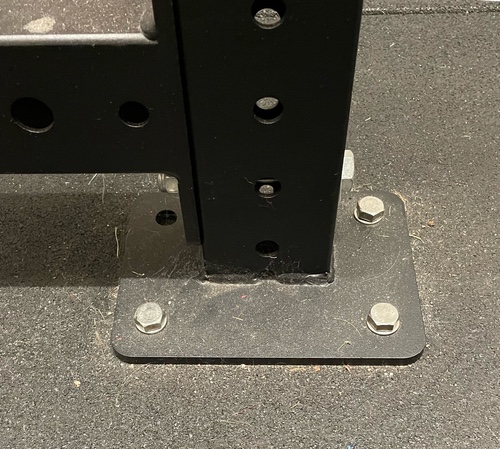
To bolt the rack down I used M10 lag bolts to secure this to my homemade gym floor (18mm crumbed rubber mat, 2x layers of 18mm plywood underneath). You can secure in to your concrete slab if you prefer – but for me I was happy to go through the mat and plywood only with bolts 45mm long. I’ve had zero issues with this set up in the time I’ve had the rack even with fairly rough racking and unracking. I do use weight storage at the base of the rack (more on this later) which may help stability.
The rack sits ON TOP of the crumb rubber matting with the bolt going through the mat and in to the plywood platform. I debated cutting out holes for the rack feet so they sat directly on the plywood but – ultimately – decided not to. There has been zero give or movement since installation and I am happy with my decision. The appearance is much neater on top of the mat rather than having to see my butchered attempt at a hole cut around them.
To set the rack up straight I would suggest marking on the floor the square base of the rack accurately. I used masking tape but you could make with chalk or similar. Shuffle the rack on to the square and then voila!
Before bolting in be sure to check the spotter arms work at every height. I had an issue initially where I had the legs slightly out of square so the spotter bars only went in up to a certain height. I am glad I spotted this before I screwed it in!
Each foot has four bolt holes to floor mount it, I have only used three on each foot (the fourth bolt is under the crossmember and I had it assembled before I realised it was inaccessible) and it has been absolutely fine like this since day 1.
Sandwich style J-hooks vs regular
When ordering I had the option of any J hook and ultimately plumped for the sandwich style.
Why?
Part was price – they were the most expensive to buy separately at the time, and as the price was the same regardless of which option I picked it seemed prudent to get these.
Secondly was shape – they are narrower than standard hooks (reducing effective width by a whopping 2”) giving a bit more wiggle room for re-racking barbells. Further they have a slight rearwards slope which means the barbell always rests in the same place in the hook. I like this. The hook itself is very long and would work well with speciality bars or thicker axel work.
Lastly the UHMW protection around the hook itself is handy to protect the hook and the barbell from damage. I’ve clipped enough J hooks to know it was inevitably going to happen so this way at least there is no damage to worry about (just my pride!) While it would just be superficial scrapes it would still bug me so it’s better to just avoid it all together.
Are they worth it? I am happy with them and glad I got them included in the price, but having used them extensively I wouldn’t pay extra for them if buying again. I think the ‘beefy’ j hooks look a good alternative with a much shorter arm (so I would walk in to them less) albeit with less protection on the bottom of the hook.
The standard hooks are fine I am sure – but I prefer one with a slope so the barbell trends to the same spot each time. Aesthetically they also look pretty plain, but that’s just my superficial side coming out…
Some of the premium J-hook options available now look interesting – notably the low-cut powerlifting and roller ones – but they are more niche and specialised. I am happy with a general set of hooks as I decided to splurge a little on a set of monolift attachments as well…
Monolift attachment – is it worth it?
One of the differentiators with ATX over some of the other UK power rack suppliers (Bulldog and Watson were also in my shortlist) is that they sell monolift J hook attachments (Rogue also offer these). They come at quite a cost (about £350) – but I was willing to give them a shot.
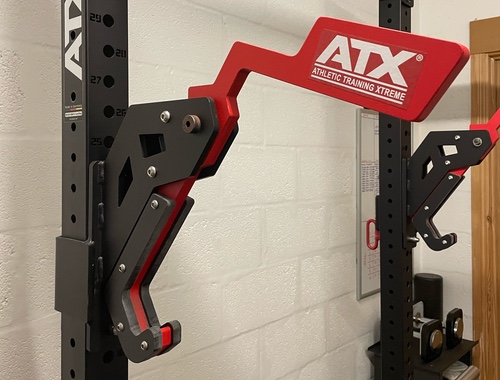
A monolift swings out of the way once the barbell is unracked. Simply lift the bar directly up and the hooks then swing back to rest against the rack uprights leaving the vertical plane completely unimpeded. This serves as a handoff for bench, and reduces (or avoids) the walkout for squats.

The design is the ‘hockey stick’ approach where a counter weight juts out the top of the hook so when unloaded the hooks rest against the upright. When a barbell is in them this weight swings the hooks out. The downside to this design is it make overhead work in the rack tough as the counterweight sits above you – particularly as my ATX rack has a 75cm working area vs some of the XL versions.
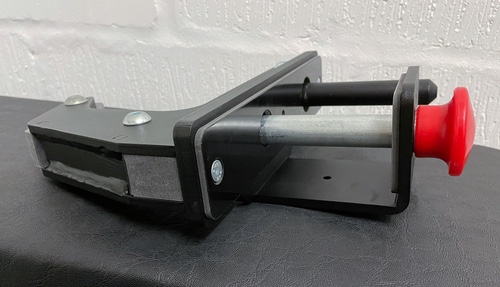
Since I purchased the full ATX Monolift Attachment 800-Series they have released the ATX Compact Monolift Hooks which fit the 600, 700 or 800 series rack ranges. These are less than HALF the cost at £159.
The design is very different with a spring loaded mechanism to return the hook to the rack eliminating the need for the hockey stick. Additionally the way they attach to the rack is different with a screw fitment on the compact pair vs a swing in and locking pin combination on the larger pair. Neither style are particularly enjoyable to move, but a screw… Ain’t nobody got time for that. Overall weight is around half the full size pair (7kg each vs a whopping 16kg) which is reflected in their weight capacities, where 300kg faces 450kg.
The compact monolifts were previously branded Barbarian line which was the lower level brand before ATX restructured their product lines. It is fair to say the compact hooks are the entry level, with the hockey stick style being the premium version.
Which version is right for you will depend on if you want to press in your rack (go compact) or if you’re budget conscious (go compact).
Is the monolift attachment worth the money, though? Absolutely. For bench they are awesome. Rarely can I say with certainty that something this expensive was worth it – but these were. It vastly reduces any feeling of shoulder impingement when unracking the weight and really has been a great addition to the gym.
For squatting I am less convinced. The reach of the monolift is not long enough to put me in the centre of the 75cm working area of my rack so I still feel too close to the uprights if I simply lift up and down. As a result I usually unrack the squat and do a half step walk out. No big deal for me – but definitely not worth £350 if this is all you want to use them for.
Box section vs strap safeties
ATX offers my preferred option of swing in, box safeties. With the locking pin in place these safety bars are absolutely SOLID, seriously they are so unbelievably locked in place they genuinely feel and act as part of the structure of the power rack. I’ve dumped a few squats and bench attempts over the years on the arms and there is absolutely NO DOUBT they will just take it on the chin EVERY TIME.
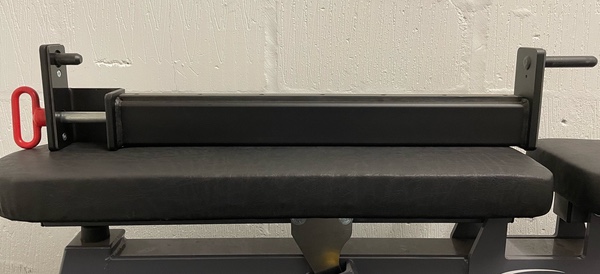
The finish on the safety bars is awesome – UHMW plastic on the inside to protect your racks finish from rubbing by avoiding metal on metal contact and a nice, thick (maybe 1cm or just under) rubber protector running along the top of the safety. This rubber top is screwed in place and has remained in great shape even after a few years of regular use.
I did consider the ATX safety strap option when ordering, but I wasn’t sure on the precision of setting them for benching safely. Some swear by them, but I am happy with the box style.
If I had gone for a Rogue R3 I would have been forced to compromise and pick the strap safeties as I am not a fan of pin & pipe.
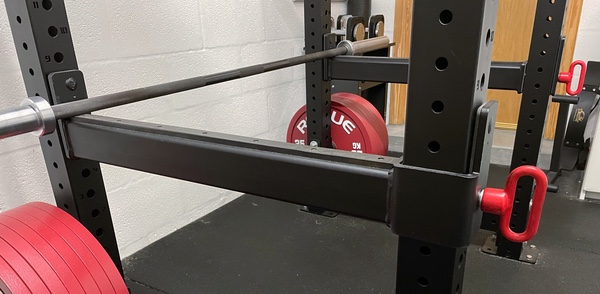
Weight storage on a four post rack? Does it work?
When I had a free standing BodyMax CF475 power rack I added some weight storage pegs to the rear in a bid to stop the thing moving around.
Maybe this made me lazy – but I really liked having my ‘big’ plates so close to hand!
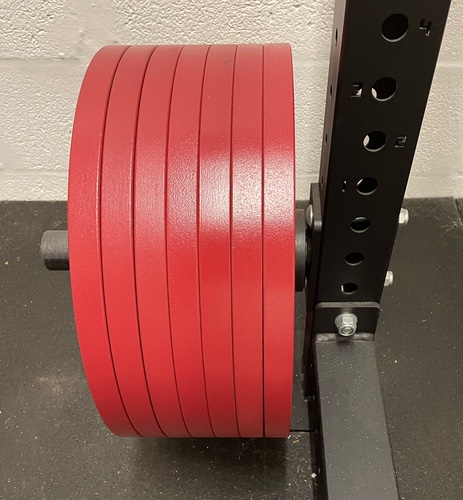
So when I was ordering my new rack I added two weight plate storage pegs to the rear of the ATX power rack. I’ve got seven 25kg on each one (so 175kg on each side) 24/7, and there is absolutely ZERO signs of any wear, tear or sag.
I’ve got a weight tree that sits to the side of my rack, but I still keep the 25kg plates on the rack. It’s just easier to have them at each side of the barbell and simply roll or lift them in to position as required instead of man handling them off of a weight tree all the time.
The real question is – does having weight storage on the rear of a four post power rack actually work, or does it interfere with the range of motion of any lift?
My response is that it has had absolutely no impact on any of my lifts. In fact, I can’t recall EVER hitting the plates on the storage pegs.
You MIGHT have an issue if you were to deadlift inside the PRX-830 as the depth of the working area inside the rack is roughly 75cm, so if you lose roughly 18cm to the plates (45cm standard diameter plate, less 80mm for the upright, then divide by 2) it begins to feel a little tight. Even then I have done it.
In truth I do all floor work including deadlifting outside the rack so rarely come up against this issue. If trying to load a barbell on the floor inside this rack be aware that the front to back crossmembers will get in the way of any deadlift jack. The crossmembers are sufficiently low they won’t foul your deadlift, but they will make it difficult to load the bar! If you want to deadlift in the rack then I would consider the flat foot equivalents more seriously.
Locking pins – you had me at unmovable J-hooks
Something I never considered before buying was the locking pin system ATX use. For the J hooks and safety bars I have, each swings in to position as you would expect, but also has a secondary locking pin which holds the attachment in place.
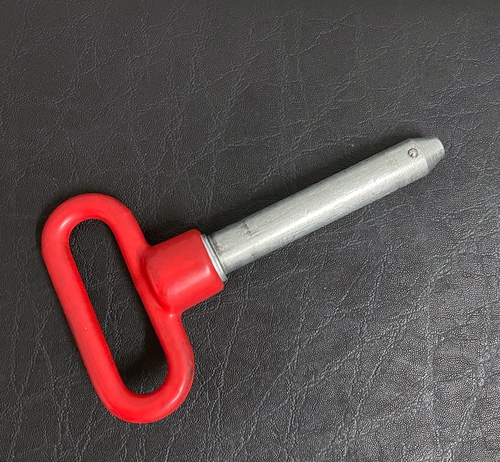
This is compared to the likes of Rogue where J hooks swing in only.
When in use this means the safeties and J hooks are absolutely SOLID. Seriously tied down – barely a millimetre of give. This is really reassuring as the rack simply feels like part of the building.
Secondly this KILLS any noise. In my house lifting quietly is welcome with family life going on nearby – and bailing or re-racking squats has become significantly easier since lifting in the ATX rack.
What ATX rack accessories are available?
On top of the specification I went for and have reviewed above, there are a TON of options from ATX to customise the rack. Off the top of my head alone I can think of:
- Various J hooks (including monolifts)
- Dip bars
- T-bar attachments
- Multi pull-up bar
- Various safety bar options (including straps)
Where the brand falls down is with access – everything is retailed via distributors who are, in my experience, excellent – but it can make the range slightly opaque as it’s not as simple as everything on one website.
Compare this to Rogue who sell direct to the consumer and it’s quite easy to see the full range of attachments for your spec of rack on their site and this can be a little frustrating.
It feels like this is a product of ATX being a more commercial focused, customisable product than Rogue – maybe they don’t want to deal with thousands of pedantic home gym users (like me!) talking about colour options and whether I can swap out a pull up bar for a crossmember when they’re main business is kitting out huge facilities.
Is it all rosey?
While the power rack is awesome, it’s not perfect. A few things that irk me:
The range is unnecessarily confusing. So much so, I have actually started another post dissecting the various racks offered by ATX. I’m pretty in to this stuff (obviously given the blog!) and even I find it quite confusing to wade through the options.
This is augmented by the decentralised sale process. With Rogue you go to their site and see EVERYTHING, whereas here some ATX distributors advertise certain products – others don’t. It’s at their discretion what they put on their website – but usually they can source anything you’ve seen elsewhere. It’s a bit frustrating not being able to see a definitive list of choices anywhere.
Why is this the case? I can only guess it is because of the commercial leanings. It feels like they are geared towards customised set ups (which is a good thing!) rather than offering ‘off the shelf’ solutions. It can make window shopping a bit awkward though as a result.
The UK distributor (The Gym Revolution) is excellent however so this is absolutely not an issue with them at all.
Another factor to consider is that ATX previously manufactured their equipment in Germany. They have since continued with German design / supervision, but moved the manufacturing to the Far East. Does this impact anything? Possibly not (my rack pre-dates this transition so I can’t compare for sure) but the direction of travel is notably against the general trend to shop local, etc with the upshot of reducing the cost and increasing the range. Bulldog for example proudly brandish the ‘British manufactured’ angle, and Rogue the USA equivalent.
I had a few teething issues with the rack (mainly the monolift arms which simply didn’t fit) but they were all sorted quickly and handled well by all involved.
ATX vs Rogue vs Bulldog: Which rack should I buy?
Let’s lay this out straight away: buying a similar spec power rack from ATX or any other equivalent manufacturer (Rogue or Bulldog) will yield similar satisfaction. These are all fairly similar, modular power racks. There is no silver bullet to make one MILES better than the other.

That said when buying a power rack you have to make a decision – and at the time I went with the ATX 800 series over the Rogue R3. The main reasons were:
- Safety bars – covered below, but I prefer the ATX box-style safeties
- Price – ATX undercut Rogue when similarly specified by around £175 at the time
- Customer service – I spent a lot of time going back and fourth with he UK distributor of ATX and they helped me land on the right spec for my needs and were a pleasure to deal with.
There is one more factor to think about…. WIDTH!
The Rogue “Monster Lite” range (so with the 3” x 3” steel uprights which are very similar to the 80mm x 80mm ATX PRX-800 series ones) has a 49” width from outside of the upright to outside of the other upright.
This compares with 48” for the ATX PRT-830. What difference does the inch make? Quite a lot as it happens.
The width between bar collars is 51.25” (measured on a Bulldog Composite barbell) meaning you have 2.25” of clearance with the Rogue, or 3.25” with the ATX. The end result is a lot lower risk of catching the plates on the uprights when walking out, or any repacking issues.
Conclusion
So to summarise I am very pleased with my ATX 800 series power rack. It is a simple, versatile 4 post rack made to a high standard. What it offers above Rogue is the locking pins for the accessories and spotter bars and a usefully narrower frame.
Would I pick the same rack again?
I think I probably would. I like the monolift attachments enough to be swayed by them. This unfortunately rules out the Bulldog range at the moment and I think pound for pound ATX is better value in the UK than Rogue.
That said, I would like to see ATX offer some of the more inventive rack designs we are seeing coming out of their competitors, or possibly some of the high end accessories Rogue offer (such as belt squats) to add value to their range for a prosumer user.
If you are looking for a meat-and-veg, amazing quality, simple, four post rack – you can’t go too far wrong with the ATX!
Read Next…
- Getting hamstring pain from squats? Here’s WHY:
- INFAMOUS squat neck bruise: Cause & CURES
- Can you put a squat rack on CARPET? Yes, BUT..
- How to bail out of a squat: WITH & WITHOUT a rack
- HyGYM Squat Rack Review: UK’s best BUDGET rack
- This is the UK’s best half rack with a pull up bar!
- What is Westside hole spacing?
- Can I have a squat rack in the upstairs bedroom?
- Bodymax CF375 Power Rack Review: Revisited in 2020
- Bodymax CF475 Power Rack Review
- Why you NEED a power rack in your home gym
- Bulldog Gear vs Rogue Fitness: The showdown
- The BEST way to heat a garage gym or workshop
- Can you put a squat rack outside? Yes, but…
- What is the difference between a rig and a power rack?