This post may contain affiliate links. Please see my affiliate disclaimer for more information.
I will get this out of the way up front – the Bulldog Adjustable 2.0 is an absolute BEAST! Sharing a ton of similarities with the REP AB-5000 I was hoping this would be the LAST bench any of us would need…
Am I right? Read on to find out for yourself!
At a glance…
- The Bulldog Adjustable Bench 2.0 is the best bench in the UK – check it out NOW
- Sturdiness is unrivalled – ROCK solid in use
- Zero-gap functionality adds value for those serious about FLAT benching
- At 147cm I found it to be quite long – make sure you have space for it…
- …BUT it can be stored on its end to save space
Best bits:
- Zero pad gap – IDEAL for those who want to hit heavy flat bench presses as well as incline / decline work
- Heavy duty construction (weighs a ton!)
- Can be stored on its end
- 12″ back pad width provides extra stability
- Ridiculously stable in use
Considerations:
- Upholstery is stitched together vs single piece on some competitors
- Angle of handle could be more ergonomic

So, is the Bulldog 2.0 the best adjustable bench in the UK?
This is quite a long review for an adjustable bench – so cutting to the chase…
Is this the best bench in the UK? Yes, but it is not perfect.
I’ve summarised the key pros and cons here, with the full review below:
| Pros | Cons |
|---|---|
| Incredibly stable in all positions | …too heavy for some? |
| Materials and construction are premium | Single piece upholstery would be a nice alternative |
| 12” / 30cm back pad width is a great alternative to traditional 10” | Handle design could be more ergonomic |
| Clever chassis design: Can roll dumbbells under it, fully secure in flat position AND offers decline | Leg attachment sold separately |
| Zero gap functionality | |
| Can be stored on its end saving space |
It is fair to say that overall this an absolutely fantastic bench. It genuinely feels like a commercial specification item in use which has deeply impressed me throughout testing. The downsides as noted above are around manoeuvrability due to the sheer size and weight – possibly the very definition of not being able to have your cake and eat it, I suppose…

Delivery & Construction
The bench arrived via a pallet with a call from the driver around half an hour ahead of delivery which was helpful so I could clear the driveway!
Unwrapping the pallet revealed a single huge box for the bench itself with a second one for the leg attachment also wrapped up on the same pallet.
Within the box the adjustable bench chassis was part-assembled with the 2x feet (2 bolts each) and 2x pads (6 bolts on the backrest, 4 bolts on seat pad) needing bolted on.
The packaging within the box was excellent with polystyrene securing the components in place and protecting it from shipping damage.

Overall I was up and running in around 30 minutes including taking some pictures for this review. Not bad at all!
Design features
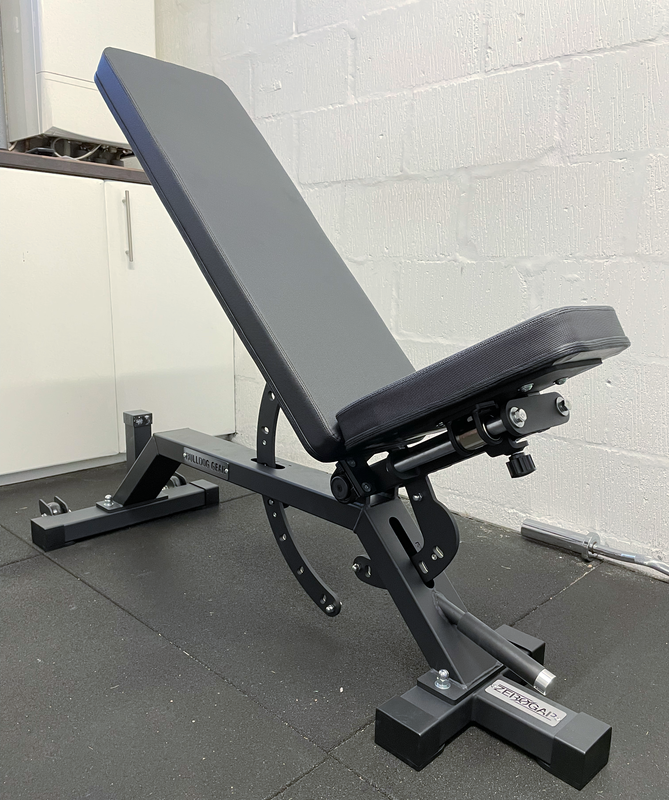
First impressions were very positive and after prolonged testing I am increasingly impressed with this bench.
Here is a run down of a few key design features and my honest opinion of them:
Stability
Having had a few different benches over the years I can truthfully say I absolutely HATE wobbly benches. They sap confidence and tangibly reduce my lifts.
The Bulldog bench is an absolute BEAST. It weighs a ton. In fact it is very possibly TOO OVER BUILT for some as it is so darn heavy it can be cumbersome to move around in tighter spaces or by less-strong trainees.
However this does mean the bench absolutely does NOT BUDGE when in use. Seriously. No amount of leg drive has moved this bench when I’ve tested it. It is an awesome bench for heavy lifters as a result.
Stability in incline positions is excellent – the frame design and weight distributions keeps it locked in place. Even doing chest supported rows on this bench – an exercise that tips my Legend 3103 bench unless I counterweight it – it remains locked in place.
Measurements & specification
Here are the key facts, figures and measurements of the Bulldog Bench 2.0:
- Weight capacity of 450kg: this bench will be MORE than enough for almost ANYONE
- Steel: 11 guage / 3mm thick steel similar to the recommended power rack spec with larger steel plating used where appropriate (check out how thick the plates are that hold the back pad on – yikes!)

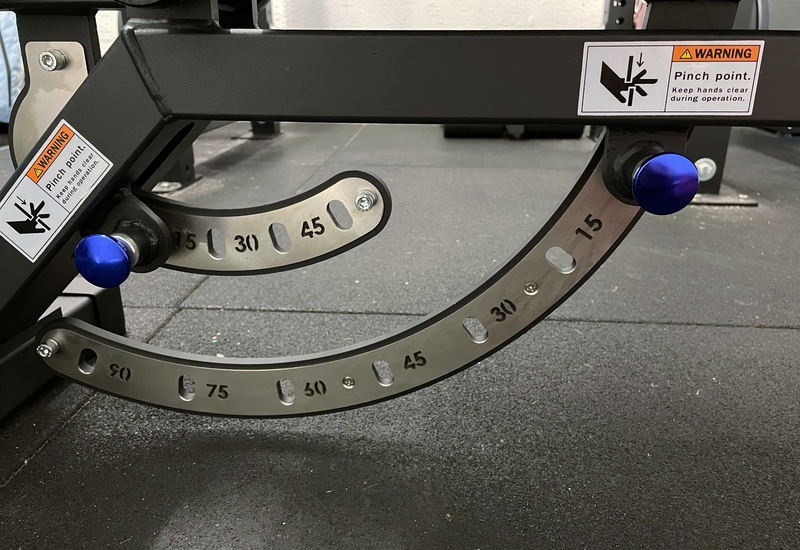
- Back pad: 7x adjustments via pop pin adjuster (0 to 90 degrees in 15 degree increments)
- Seat pad: 5x adjustments via pop pin adjuster (-15 to 45 degrees in 15 degree increments)
- Note that on both the backrest and seat adjusters there are steel wear guards marked with the degree adjustment
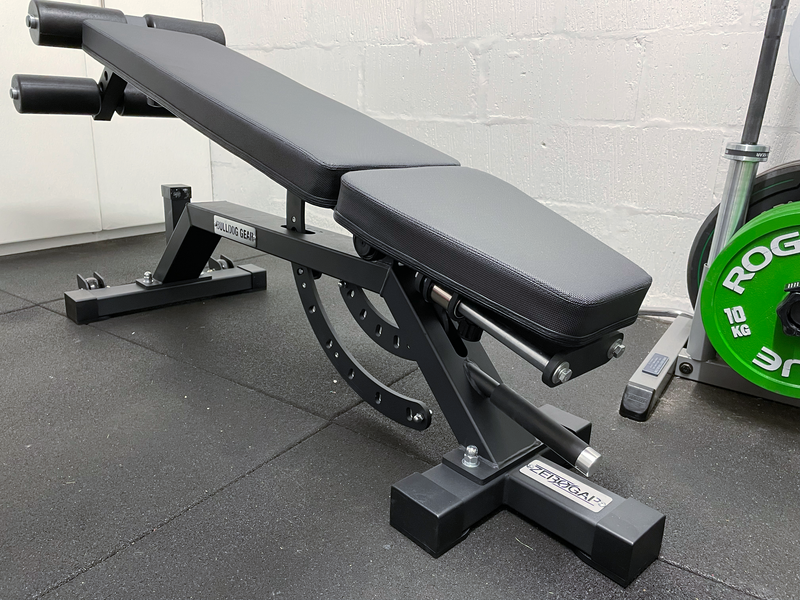
- Width: 30cm / 12” back pad; Seat pad similar but with a gentle taper
- Measurements: 147cm long x 54cm wide x 45cm high. This thing is huge.
Overall this is a beast of a bench and genuinely makes my Legend 3103 look tiny by comparison both in terms of SIZE and WEIGHT.
For taller users this bench is excellent due to the length. For shorter users (like me!) I can stabilise myself completely on the back pad alone – never mind the seat pad Or ‘zero gap’!
Pads
Both the seat and back pad are covered in commercial grade upholstery with a dimpled and quite grippy surface. The pads are around 2.5” thick and don’t compress noticeably under load (a good thing in my view).
In my opinion the one area of improvement for the Bulldog Bench is the upholstery. While it is quite sticky and feels good in use I prefer the single wrapped finish on the Legend bench (albeit the Legend material is more slippery by comparison).

The Bulldog upholstery by contrast is made up of a few pieces and has seams that run around the perimeter of the pad. I have had no issues, but simply prefer the seamless design.
The dimpled texture catches bits of chalk etc in use but I’ve found it wipes off easily so is not an issue.
While I have had no problems so far but part of me thinks the joins in the fabric COULD be a weak point over time. I am sure I will end up proved wrong however!
Frame
The metal chassis is EXTREMELY heavy – to the point it was surprisingly difficult to unbox on my own as it’s heavy and quite awkwardly shaped!
Overall design is excellent, the back pad has support underneath along the full length of the bench when in the flat position (i.e. for the heaviest lifts) and the support is further strengthened by a separate upright support under the top of the back pad to ensure it’s supported as much as possible.
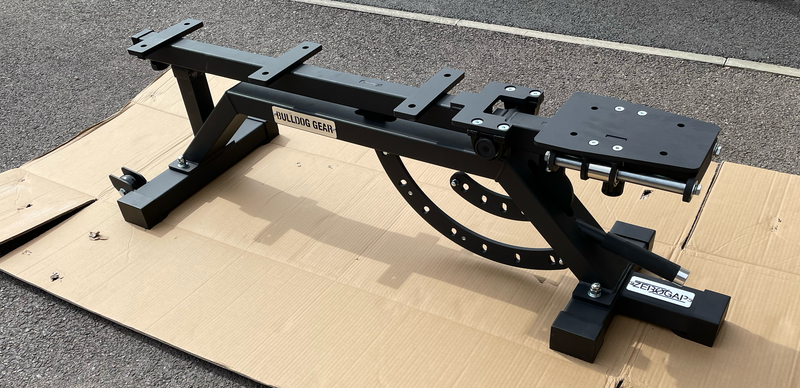
I have seen some benches styled on the REP AB-5000 design BUT without the flat chassis underneath – this would reduce stability in the flat position and is – in my opinion – a poorer design and a compromise. I am glad Bulldog did not go down this route.
Back the Bulldog 2.0, it is extremely stable and robust. In position it feels MORE secure than the Legend bench I have compared it to. By comparison the Legend – while being rock solid and full commercial spec – allows a tiny bit of side to side movement in the pad itself when flat. The Bulldog is resolutely locked in place.
The U-shape is sufficiently high that a dumbbell can be rolled under the bench – this is handy for one arm movements such as DB rows.
Pop-pins are used to adjust the pads and the quality of workmanship and tightness of clearances is very high which contributes to the robust, wobble free feeling in use.
An improvement would be to tweak adjustment mechanism to make reading the angle markings easier when adjusting. With the chassis being so wide you need to bend down and crane your neck to check the settings as the laser cut angle reading and the pop pin are obscured by the width of the chassis itself. This is a side effect of having the adjusters pierce through the centre of the frame.
If the adjuster instead ran down one side of the bench or had the angle marks showing at the top of the frame it would be more ergonomic to use.
This is not a deal breaker at all – but it is an area where they could improve further. The Legend 3103 by comparison has its adjuster running down one side of the steel frame and as a result is easy to see what you’re doing (albeit it doesn’t have laser cut angle markings which is a downfall).
Feet
The rear foot is wide with 2x quite big caster wheels to move the bench around.
Meanwhile the front foot is a bit of a T-Rex… A three pronged, narrow foot designed to keep out of your way if you use a narrow stance when benching (I do this thus the preference for three footed style benches). The extended front foot is a bit awkward to get used to in all honestly BUT it provides a ton of stability in decline positions and is therefore necessary.
When moving it can be a bit fiddly to move your hands and arms around it particularly with the low, outwards protruding handle (more on this later).
If there was a way to drop this safely in future without hampering the stability it would be neat and would, in my view, improve the look and manoeuvrability of the rack.

What is absolutely excellent is the rubber / plastic covers on the feet. They are mega and keep the metal in perfect condition. By contrast the Legend shipped with rubber ‘caps’ that have perished a bit with visible cracks and occasionally need tapped back on to the bench.
Wheels
The wheels have metal plate covers that might look a bit weird initially but are actually a REALLY cool feature as they allow the bench to be stored up on its end in a stable fashion.
The caster wheels are slightly larger diameter than Legend use but functionally they are near identical – very smooth rolling, quiet wheels that are ideal for moving around a flat gym. Bumping up and down platforms is a bit awkward given weight of the bench, the size of the wheels and the metal covers which all coalesce to make it a bit awkward.
In my gym I rarely need to bump down off my platform space and therefore it is not an issue. If you regularly do this then it may be a more relevant point.

Handle
Sticking out sideways the handle on the Bulldog adjustable bench looks a little… Weird… But there is logic…
Having the handle at this angle lets the seat pad drop to -15 degrees for decline work (see later).
The trade off is this is not an ideal angle for manoeuvring the bench around in tight spaces as it doesn’t lend itself to lifting the bench up quite high particularly with the three pronged front foot protruding in to the same space as the handle.
A more typical handle that is perpendicular to the floor would make this easier – BUT then it might foul the decline.

PERSONALLY I think the handle design could be tweaked in to something more ergonomic, but it is not a deal breaker.
The handle itself is rock solid with a grippy rubber-type coating that wears well.
Adjustment
As covered briefly above pop pins are used to adjust the angle of the pads – this is a steel prong that is spring loaded so you pull it out, move the pads then release and it fires through a laser cut hole to hold the pad in place preventing movement up or down.
The Bulldog 1.0 bench has a ladder style adjustment mechanism which is where the pads are not locked in place but are ‘sat’ in a position. I prefer the locking of the Bulldog 2.0 pop-pins personally, but ladder style is very common and features on some awesome benches.
Having laser cut angles on the side of the bench adjuster is a great touch and really adds value to the bench for a home user – it’s so easy to note if you’re using a 30 degree or 45 degree angle for example, compared to counting holes or trying to remember what was “low incline” last time…

One improvement, as noted previously, is that the back pad adjuster goes through the centre of the frame with the pop-pin underneath. This makes it a bit awkward to see the pin and angles when adjusting. If this was tweaked to run along one side of the chassis (like Legend do on the 3103), the adjuster handle size increased, or the angle markings moved to the TOP of the chassis this would be eliminated.
Secondly the 90 degree upright angle is truly bolt upright! A slightly more natural 80 degree or similar would likely be more comfortable for me personally and I have seen others say similar when testing the similar REP AB-5000. The practicality of this when the increments are a neat 15 degrees might be difficult though so I understand why it is not an option (it may also set my OCD off if the adjustments were not even!)
Obviously both minor issues, but I wanted to highlight it (in case Bulldog read this and decide to do a 3.0!)
Zero gap: Is it worth it?
One of the main selling points of this bench is the ‘zero-gap’ functionality. If you’ve used an adjustable bench you will no doubt have found yourself sliding in to the Grand Canyon, also known as the 3-4” gap between the seat and the backrest on an adjustable bench.
The Bulldog 2.0 adjustable bench can be set up so there is NO pad gap in ANY position. Sound good? Here’s what you need to know:
How does a zero gap bench even work?
We have covered adjusting the pad ANGLES, but what about the pad GAP?
As well as the angle adjustment that is controlled via the pin on the SIDE, the seat pad has a second adjuster under the FRONT that is a screw / pop-pin combination. Unscrewing this adjuster lets you slide the seat forwards or backwards along two rails. Pop the adjuster back and tighten to lock in place.

What is a gapless bench like?
Having no pad gap when flat benching is 100% worth it. In all other positions I am more relaxed, but for heavy benching having no gap has been excellent.
BUT it is worth remembering that given the pure LENGTH of this bench I can flat bench on the back pad alone! So the zero-gap adjuster is excellent but a neat trade off could have been a more compact bench (or maybe I’m just too short!)
The downsides to the zero gap function are TIME taken to adjust – an extra 20 seconds to adjust the fore/aft slider – not too long in isolation but still worth mentioning in case you vary angles a lot.
It also impacts on seat pad stability. When locked in place the seat pad is solid. BUT I wouldn’t use it without tightening that adjuster, so if you’re thinking you will just leave it slackened between exercises… You won’t. When loosened off the seat can be wobbled from side to side more than a standard (non zero-gap) bench if you shake it by hand (perhaps like only an overly enthusiastic gym equipment reviewer would!)
When locked in place it is robust, and I have felt absolutely NO movement in normal use. Incline, decline, flat – it genuinely feels as sturdy as a fixed bench in any equivalent position.
Is a zero-gap bench worth it?
Yes.
Bulldog Adjustable Bench 1.0 vs 2.0 is a great like for like comparison given both are of similar quality.
The cost difference is what we need to focus on. At <£100 difference between a high quality bench WITH a pad gap and one WITHOUT then that is worth spending the extra on.
At that price differential it is worth it for the pop-pins and gapless flat benching alone in my view. Adding the decline attachment and extra training options that opens up makes this a really compelling product.
How does the ‘decline’ leg attachment work?
I spent longer than I care to admit craning my neck trying work out just HOW the Bulldog 2.0 (and the pretty much identical REP Fitness AB-5000) were true FID benches given they were based on a flat chassis!
So here is what you need to know:
Using a decline attachment on this FID bench
So how does the decline setting work on a REP AB-5000 or Bulldog 2.0? By using it upside down.
The seat pad drops bellow parallel (down to -15 degrees) then the back rest can be tilted upwards. Slot the optional decline attachment in to the TOP of the bench then climb on!
I was initially apprehensive that this would be wobbly having all my weight at the top of the bench but it is absolute SOLID. Similar to flat and incline work the bench feels carved out of stone in use and completely IMMOVABLE. Genuinely doesn’t feel like an adjustable bench when you’re on it!
Recently i was doing weighted sit ups and found myself casually sitting between sets right at the top of the bench holding a weight plate. This bench didn’t show a HINT of toppling or being unbalanced.
Honestly – what an absolute BEAST!
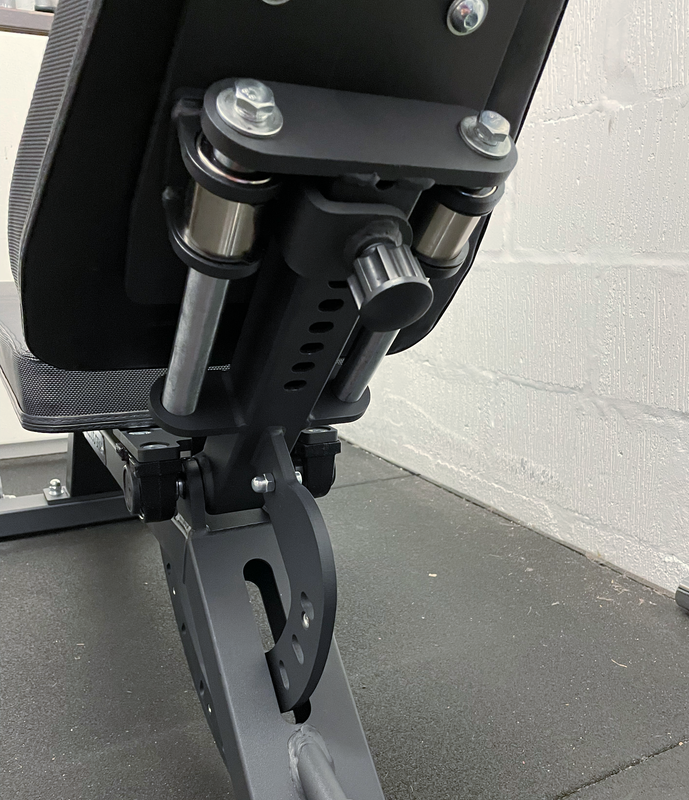
How adjustable is it?
Adjustment is achieved by moving the two rollers through one of four holes to suit your legs and body shape. The rollers are secured with small collars that are tightened with an Allan key so it is a touch fiddly to move around mid-workout so if you can ‘set and forget’ this will be easier.
It would have been great to see the adjustment being a little easier to do on the fly – it would have made flipping between exercises a little easier. As it is I leave one collar OFF permanently so I can quickly flip it around.

Build quality & construction
Similar to the Bulldog 2.0 bench itself this attachment is seriously heavy duty with thick steel making the body of the attachment. The leg pads are very firm which is IDEAL. Too soft and they are no use in my opinion so I think these are perfect.
The attachment is quite heavy given the quality of metal used in construction but it’s easy to manoeuvre as it’s simple to grab the metal frame directly and lift it. Given the physical size of the attachment it can be a pain to store if you are short on space.
Leaving it the bench might work if you have room but remember as it protrudes from the TOP of the bench you will need more space between your power rack / bench station and wall (something I don’t have unfortunately).

As noted above the pads are held on with small collars – it would be good if these were more adjustment-friendly, but my workaround is to leave one off and it has caused me no issues.
Is it useful?
Yes – for the money it opens up a full range of motion (decline) we would be otherwise missing. As it attaches to the bench it means we can do all this without adding more bulky equipment.
Here are a few things I am regularly doing with the decline attachment:
- Split squats – the pads are genuinely excellent so if you can adjust them to the right height for your body they are FANTASTIC for split squats.
- Ab and core work – decline sits ups, holds and twists are helping build my lower abs and obliques
- Traditional weight lifting – decline dumbbell bench press and fly movements are EXELLENT
- Nordic curls – an alternative way to hit hamstrings
At the moment I am using it frequently.
Is it worth the money? I am glad I have it as I use it for the above movements regularly, but if I was on a strict budget when ordering and was less interested in these I would be more than happy to have the bench on its own.
Conclusion
Ultimately this bench is unbelievably sturdy and that must be the priority in a weight bench. As soon as you get your hands on it you just KNOW this thing will be unmovable. I’ve been testing this bench for a few months now and it’s exceeding every expectation in day to day performance.
Is it perfect?
No – while it is unbelievably STURDY it is also a touch BIGGER than I would like for my tiny gym, and a couple of design features (looking at you, handle) could be tweaked to be a LITTLE more ergonomic.
But overall? Probably the only bench any of us will ever need. My take? If you have the budget and the space, buy it.
Best bits:
- Zero pad gap – IDEAL for those who want to hit heavy flat bench presses as well as incline / decline work
- Heavy duty construction (weighs a ton!)
- Can be stored on its end
- 12″ back pad width provides extra stability
- Ridiculously stable in use
Considerations:
- Upholstery is stitched together vs single piece on some competitors
- Angle of handle could be more ergonomic
HI ,thank you for your review, but I need to know how long the seating earea is in length as I am 6’4 tall and how long is it when the zero gap is in place?
Hi Ste, I just measured and the length when in zero-gap mode is 54″ / 138cm. Hopefully that helps!
If the zero gap is in place what is the length of the backrest and seat ?
Hi Ste, I replied to your earlier comment but I just measured and the length when in zero-gap mode is 54″ / 138cm. Thanks